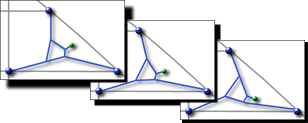
Active Bridle
The Active Bridle is another generic name for a class of dynamic bridle designs that are characterised by having one or more additional bridle lines, known as "Activators". These are used to connect two (or more) main bridle legs together and pull them in slightly to create a controlled element of movement in the bridle. They are an improvement over traditional dynamic bridle designs in providing a greater level of control over the degree and direction of movement that the activators impart. This page describes the original Active Bridle configuration, compares it to a static bridle and discusses the improved flight characteristics that it brings to a kite. An overview of the construction of an Active Bridle is also provided.
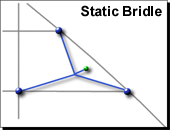
Consider first a standard "Static Bridle" as shown in Diagram 1. Three bridle lines conjugate at a static point that is fixed relative to the position of the kite. This point is known as the "tow point" and usually has a final short section to which the flying lines attach (green marker).
Most dual line kites allow some degree of tuning in the bridle, by lengthening or shortening the relative lengths of these sections, to change the flight characteristics of the kite. In general, moving the tow point relative to the kite in the following directions has the corresponding effect:
- Tow point moved up towards nose
kite becomes more responsive in light wind but may over-fly and become over-powered in higher wind. Precision is often improved but kite can become overly sensitive requiring more precise execution of tricks. Stalls are difficult to maintain due to the kite's increased forward drive. - Tow point moved down away from nose
kite has better high wind handling but may lack drive in lighter wind, refusing to move forwards. This characteristic can make stalls easier to hold, but the kite's tighter and faster turn rate can create a tendency to roll from side to side in stalls as well as a greater possibility of over-steer in turns. The "looser" feel contributes to a smoother and more forgiving responsiveness to tricks. - Tow point moved out towards leading edge
kite has faster, more responsive turning ability but may wobble when tracking or over-steer in turns. - Tow point moved in towards centre T-Piece
kite tracks better and performs crisper sharp corners, but lacks smoothness in turns.
Different positions have their own benefits and drawbacks and any position is essentially a trade-off between different characteristics.
The fundamental principle of any dynamic bridle is to have a tow point that can automatically move its position relative to the kite. The Active Bridle does this with the addition of two extra legs that give the bridle the required latitude of movement in the correct orientation to optimise the benefits of variable bridle positions for different conditions, positions, maneuvers and tricks.
As is typical of all dynamic bridle configurations, the Active Bridle allows movement of the tow point while keeping all sections of the bridle taut. This is necessary to maintain the best level of control of the kite and to optimise the responsiveness of the kite to user input. For the tow point to move in a static bridle, one or more lines of the bridle must go slack. The design goal for the Active Bridle is to allow as much movement as is necessary to improve the flying characteristics of the kite while maintaining the shape and tautness of the bridle as much as possible.
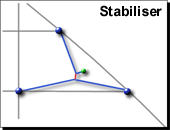
The first additional leg, known as the "Stabliser", shown in red on Diagram 2, makes a connection between the upper leg and the lower legs.
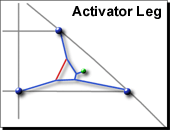
The second additional leg, known as the "Activator", shown in red on Diagram 3, connects the inner and upper legs together, pulling them in slightly.
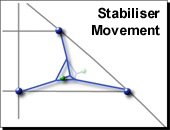
Diagram 4 shows the effect of the Stabiliser leg in allowing the tow point to move out towards the leading edge and in towards the spine. The effect of this is such:
- When the kite is being flown in a straight line, pressure is roughly equal on each flying line (i.e. the flyer's hands are at the same distance). In this state, the Active Bridle shifts to move the tow points further in towards the spine. This increases the precision in straight line tracking.
- When the flier pulls (or pushes) on one line to execute a turn, the tow point on the line being pulled moves out towards the leading edge. This improves the kite's turning ability.
- The turning rate of the kite can be more closely controlled. A slight difference of pressure on the lines will create a slow, arcing curve, while at the other extreme, a hard pull on one line will create a very fast and tight spin.
Diagram 5 shows the effect of the Activator in controlling the pitch of the kite, effectively moving the tow point relatively up or down.
- When the pressure on the sail is light, the tow point shifts up, effectively pulling the nose of the kite in towards the flier. This improves the kite's responsiveness in light wind and also at the outer and upper edges of the wind window.
- When the pressure on the sail increases, the tow point shifts down and the nose of the kite is pushed away from the flier slightly. This slows the kite down in high wind and helps to control speed in the centre of the wind window. It also serves to buffer gusts, making for a smoother flying kite.
- The effects of pitch control as described above give the kite a larger wind window and provide a more consistent speed across different parts of the window and in different wind conditions.
These two effects when applied in conjunction by the Active Bridle, give a kite that has better precision, sharper tracking, smoother turning, increased wind range and window size and a more consistent speed. It is the combination of the benefits of different bridle adjustments without any of the drawbacks. Furthermore, the adjustments that permit this flexibility happen automatically in immediate response to the wind and the pressure on the flying lines. This can all but eliminate the need for manual bridle adjustments.
The Active Bridle has shown itself to not only be well adapted to improving the precision, wind range and smoothness of the kite, but also to greatly increasing the kite's ability to perform advanced freestyle and trick flying maneuvers. This is perhaps the most significant achievement given the fact that precision and trick flying have very different requirements and make wildly different demands on the kite and bridle.
Dynamic bridles have previously had some considerable degree of success in improving the freestyle performance of kites, but usually at the cost of precision. Careful analysis of the dynamics of a kite during different kinds of flight (tracking straight, turning, stalls, Axels and Flat Spins, Flic-Flacs and Fade, etc) has identified the desired movement of the bridle in each of these conditions. The Active Bridle configuration is designed such that the bridle not only moves, but moves in the right direction, when required to do so. Whilst it is possible to break down the movement into horizontal and vertical components, as described in the previous section, it is important to realise that the combined effect is a synergy of movement in all 3 dimensions that, when carefully tuned to the size, shape, and aerodynamic qualities of a given kite, can afford a remarkable diversity of control and flexibility to the flier.
The specifics of the movement of the Active Bridle and the effects noted are discussed here in further details:
The Active Bridle makes it easier to control the kite in a stalled position. Kites that are traditionally more precision-orientated are often solid and steady in a stall. Kites that are aimed more towards freestyle flying tend to have greater responsiveness to turning. This sensitivity makes stalls hard to perfect. The kite will typically roll one way or the other, rather than sitting steady with the nose pointing straight up.
A kite with a static bridle will normally stall best when adjusted with the tow point slightly low. This pushes the nose of the kite away from the flier and reduces its forward drive. The relative pressure is increased at the top of the kite as more air bleeds over the nose and leading edges. This force, being applied above the centre of gravity of the kite, further increases its tendency to roll sideways.
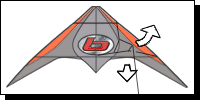
The stalled position with the Active Bridle has the nose of the kite being pulled in towards the flier. More air bleeds over the trailing edge and the relative pressure increase is concentrated below the centre of gravity of the kite. This creates a much more stable stall with significantly less rolling of the kite.
The nose is pulled in by the action of the Active Bridle responding to a drop in overall pressure on the kite. When the flier adds slack to the lines, as is typical when executing a stall, this sudden lack of pressure causes the tow point to shift far up, pulling the nose right in. The angle of the kite reaches a point where it will no longer fly forwards and it effectively remains "parked" it in mid-air. While the lines remain slack, the kite will remain stalled.
Taking up the slack on the lines increases the overall pressure on the kite and the Active Bridle shifts the tow point down to allow the nose to drop back again. This permits the kite to power up and fly off. The transition between stall and flight is fast, positive and crisp. There is no "nodding" of the nose of the kite as can be experienced with other dynamic bridle configurations.
|
|
Diagram 6 Stalled Position |
The Active Bridle's pitch control not only allows the flier to adjust or correct the orientation of the kite in a stall, but also helps to keep the kite level when executing side slides. To correct an imperfect stall, or to introduce a side slide from a stall, slight pressure is applied to one or other line. In normal flight, pulling one wing towards the flier would cause the kite to rotate in that direction. In the stalled position, pulling gently on one line causes the tow point on that side of the kite to be pulled outwards towards the leading edge as the Stabiliser shifts. The tow point remains high due to the relatively light pressure on the lines and is now in a position above and outside the centre of gravity of the kite. This has the effect of keeping the wing lifted upwards to counteract the natural turning moment induced by pulling the it in towards the flier. This is shown in Diagram 6.
|
|
Diagram 7 Tip Stand/Drag |
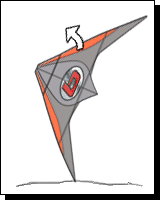
When holding the kite in a Tip Stand, or when executing a Tip Drag or Leading Edge drag, the same action of the Active Bridle moves the upper tow point out towards the leading edge when pressure is applied to that line. This helps to keep the kite stable and lifts the nose up enough to counter the tendency for it to roll downwards and snag on the ground. This is shown in Diagram 7.
The range of tricks based around the Axel and Flat Spin share the common characteristic that the kite rotates in a flattened orientation with the face of the kite pointing towards the ground. The Active Bridle makes this kind of maneuver easier and cleaner by smoothing the transition into the trick. An Axel is executed by pushing on one line and then giving a sharp pop on with the same hand. The initial push is the setup required to cause the nose to dip, bringing the kite into the flattened position.
The action of the Active Bridle, when slack is applied to the lines, is to raise the position of the tow point, effectively pulling the nose in towards the flier. The push given as a pre-cursor to the Axel "pop" causes the Active Bridle to act in the same way, quickly lowering the nose ready for the transition into the trick.
The movement created by Active Bridle allows the flier to take up the slack and apply further controlled input during the execution of Axel-like tricks. Multiple Axels and Multiple Flat Spins become easier to achieve by the fact that the bridle compensates for incorrect or badly timed input. The required "point" at which a trick requires further input to continue, becomes a wider "zone", making such tricks easier to get right and smoother in execution.
The pitch control provided by the Active Bridle allows some movement of the nose, forward and backward, to regulate the kite's handling of different wind conditions. This movement also proves to be of some considerable benefit when executing tricks such as the Fade, Flic-Flac, etc., where the nose is deliberately pulled far forward or thrown right back.
The Active Bridle makes this transition between states smooth yet positive. It produces a cleaner, more controlled performance that looses little or no height. An Activated kite tends to lock into a Fade and hold it far better than normal. This behavior often implies a limited ability to Flic-Flac in a kite, but the Active Bridle does not appear to have any such limitation. It is possible to hold Rising Fades (Elevators) and also to execute Rising Flic-Flacs with the same kite without requiring any manual bridle adjustment.
The Active Bridle can also significantly improve the performance of Cascades and Fountains. The 3-step "Pop, Pause and Pull" approach to these maneuvers - "pop" the Axel, pause while the kite rotates half a turn or so, then pull the other line to lift the wing up - makes precise control of a Cascade much easier to achieve and also helps to reduce the amount of height lost in each iteration. This allows the flier to perform longer Cascades and eventually progress to the point where the kite gains height rather than loses it: The Fountain. This becomes significantly easier with an Active Bridle.
There are a number of clearly distinct benefits that the Active Bridle gives, such as those discussed already. Going beyond the specifics of certain tricks, the Active Bridle has a feeling and a forgiveness that seems to enhance the flying characteristics of a kite in almost any situation or position. This opens up new windows of possibility and allows the flier to discover so much more about what the kite can really do.
With an Active Bridle, the kite will accept input from almost any position in the sky (and in many cases, on the ground), and behave in a controlled and predictable fashion. This allows many existing tricks to be executed in new orientations and in different ways.
The Active Bridle improves many characteristics of a kite's flight. To the best of my knowledge, this benefit is granted without any compromise. There is nothing about the way a kite flies that the Active Bridle makes worse.
There are drawbacks, however, but these manifest themselves in the design, construction and understanding of the bridle configuration.
The fact that the bridle is more complex than a static, or other dynamic, bridle makes it harder to design for a specific kite. There are more sections to adjust, more parameters to change and more for the designer to understand about the perceived effects of changing these elements.
To compound the problem, the Active Bridle is more sensitive to tuning than most other bridles. Whilst it is a fairly easy matter to simply get the kite flying, the hard part is the fine tuning required to balance all of the bridle's features against each other. Getting the kite to Fade and Flic-Flac, providing both precision and extreme trick-ability, and have the kite stall well without losing firm, positive drive, are all examples of the contrasting characteristics that can be achieved without compromise, with the sufficient amount of time, patience and understanding.
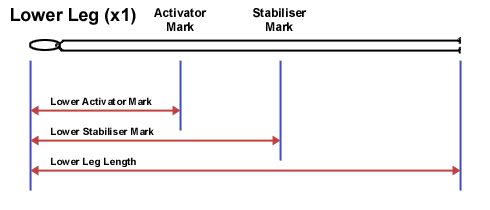
The Active Bridle uses a single lower leg piece running all the way across the bottom section of the bridle on both sides. This section is created by tying a loop (see above) and measuring down the required length (typically around 1.50m) and cutting both ends with enough excess to make flanges. The distance down the line is measured from the back of the loop rather than the knot. When using a bridle stick, the loop can simply be hooked over the nail at the 0-Line to achieve the correct starting point for the measurement.
|
|
Diagram 8 Lower Leg |
Two marks are required on the bridle to indicate the connection points for the Activator and Stabiliser section. These are known as the Activator Mark and Stabiliser Mark and are both measured down from the end of the loop. The lengths from the loop to these marks are known as the Lower Activator Mark (LAM) and Lower Stabiliser Mark (LSM) lengths. The overall length of the legs from loop to end is known as the Lower Leg Length (LLL).
The lower leg section is attached to the kite by passing the loop over the lower end of the spine and pulling it up to the T-Piece. The loose end are then fed through the T-Piece cutout from the back. The loose ends are tied, one to each lower leading edge spar, directly below the connector and above the C-clip, using the Frame Knot technique desribed earlier.
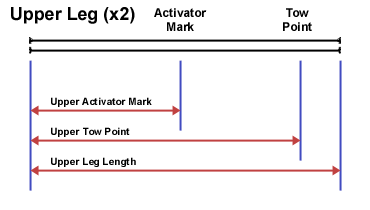
One upper leg section is required for each side of the bridle, making two in total. These sections are of a fixed length and require flanges at each end. Remember to cut a little surplus length in the line and then melt the flange down until the line is of the correct length.
|
|
Diagram 9 Upper Leg |
Two marks are made on the upper leg sections, both measured down from one end (the upper end). These marks are known as the Activator Mark and the Tow Point. The Activator mark will be roughly half way down the line. The Tow Point will be close to the lower end of the line. These lengths from top end to mark are known as the Upper Activator Mark (UAM) and the Upper Tow Point (UPT) lengths.
Attach the upper end of the line (furthest from the Tow Point) to the upper leading edge spar of the kite, directly below the connector and above the C-clip, using a Frame Knot.
Attach the lower end of the upper line to the lower bridle leg at the Stabiliser Point using a Sheet Bend.
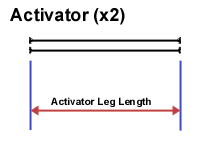
Two Activator legs are required, one for each side of the kite. These are short lengths (about 15cm) that require flanges in both ends. No markings are required on the lines. The length of the line is the Activator Leg Length (ALL).
|
|
Diagram 10 Activator Leg |
Attach one end of the Activator to the lower leg on the Activator mark using a Sheet Bend. Attach the other end to the upper leg on its Activator mark, also using a Sheet Bend. The Activator leg should now connect the upper and lower legs, pulling them slightly in towards each other.
Two tracers are required, one for each side of the kite, made as described in the earlier section. The tracers are attached to the upper legs using a Prussik. The knot should be moved onto the Tow Point mark and then rolled over to lock it tightly in place.
The section of the upper leg below the Tow Point has now become the Stabiliser leg.
Congratulations, your kite has been Activated!
