Bridle Knots
This page contains information about tying various knots that are useful in the construction of bridles.
|
|
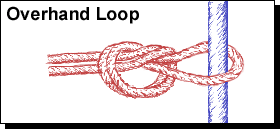
Diagram 1 Overhand Loop |
The connection of a bridle at the centre T-Piece of the kite is usually best achieved by doubling over a length of bridle line and tying a simple overhand knot around the doubled line.
This creates a loop which will slip around the spine of the kite (usually below the T-Piece). The two loose ends become the inner legs of the bridle on each side of the kite.
When tightening this knot, it is useful to first slip the knot over a spar from the kite in question (or one of the same diameter) to ensure that the loop is a reasonably snug fit.

|
|
Diagram 2 Sheet Bend |
The Sheet Bend can be used to join the loose end of one piece of bridle line (which should be flanged at the end) to the middle of another continuous piece. The knot holds fast in even extreme conditions, yet remains relatively easy to loosen and accurately adjust.
First, fold over the continuous section at the required mark to create a loop. Feed the loose end up through the loop from behind, and down back around the outside of the loop. Bring the end right around the loop and then tuck it back under itself. The loose end should be running under the part of the line pushing up through the loop, but over the edge of the loop itself.
To tighten the knot, gently pull on the long end of the single section of line, holding the loop folded over at the required point with the other hand. Nudge the loose end in towards the knot and tighten until it lies snug up against it. The flange at the end of the should prevent the end from slipping through the knot.
|
|
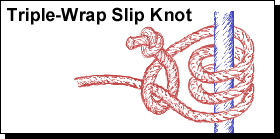
Diagram 3 Triple-Wrap Slip Knot |
This knot can be used to attach a loose end to a continuous length of line in such a way that the knot will hold fast in normal use but can be moved up or down the line for adjustment when a little pressure is applied. It is typically used to connect activator legs to main bridle legs. If you're using raw Spectra/Dyneema or some other unsheathed line for your activator (loose end) then it should have a single overhand stopper knots tied in the end. Regular sheathed bridle line should be flanged.
The loose end line should be passed 3 times around the bridle line and then finished in the same way as a regular slip knot. When pulled tight, the knot should remain in position on the bridle line. It can be moved for adjustment by holding the knot and sliding it with a little force up or down the bridle line. Check that the knot is tight after adjusting to avoid further slippage.
|
|
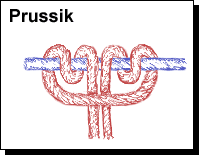
Diagram 4 Prussik |
The Tracer section is attached to the bridle with a Prussik. This can be thought of as a "Double Lark's Head". The Prussik is advantageous because it can be rolled over itself to lock it tight in position, or opened back out to allow it to slide along a line for adjustment.
Take a Tracer loop and pass the knotted end behind the continuous length to which you're attaching it. Bring the knot up and over the line and then feed it through it's own loop end. Bring the knot back around and through the loop once more and then pull the knotted end tight.
When the continuous length is pulled tight so that it straightens out when going the knot, it will allow the Tracer to slide up and down it. By pulling on the Tracer and holding the Prussik knot between one's fingers, the knot can be rolled back on itself (looking much more like a Reef Knot) to lock it into position.
|
|
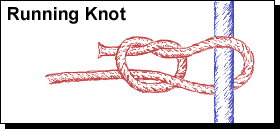
Diagram 5 Running Knot |
The final knot to learn is the Running Knot, used to attach the bridle to the frame of the kite. There are many methods employed for attaching bridles to kites; one can tie the line around a leading edge connector, tie it around the spar, under or over the fixing, perhaps also with a stopper, use a loop, use a loose end, or configure it in any other way you see fit. I've learned from the experience, and adopted the practice of Tim Benson who bonds a small C-clip onto the spar with super-glue, sitting directly beneath the leading edge connector. The bridle line is tied around the spar between the connector and C-clip. Pushing the connector up away from the C-clip stopper makes tying and tightening the knot easier. The connector can be pushed down again once the knot has been tightened.
The knot employed is a basic Running Knot with a flange in the line serving to stop the tied end from slipping through the knot. The loose end is passed around the back of the spar and then up and around itself. The loose end is then tucked through the loop it has just created by doubling back on itself. The overhand knot that has effectively been tied around the long end should be tightened so that the flange on the short end lies snug against the knot. The long end can then be pulled to tighten the slip knot up around the spar.