Cross Active Bridle
The Cross-Active Bridle is the latest and most advanced Active Bridle configuration while also being one of the simplest to design, construct and adjust. It was originally designed as a replacement for the original Gemini bridle but has also proved itself to be suituable for most, if not all dual line kites. The same basic principles have also been applied in the design of the bridle for the Airbow quad line kite.
One of the great things about the Cross-Active Bridle is that it is based around a regular static bridle. This makes it easy to adapt kites with existing static bridles and also simplifies the process of designing a new bridle for a kite from scratch.
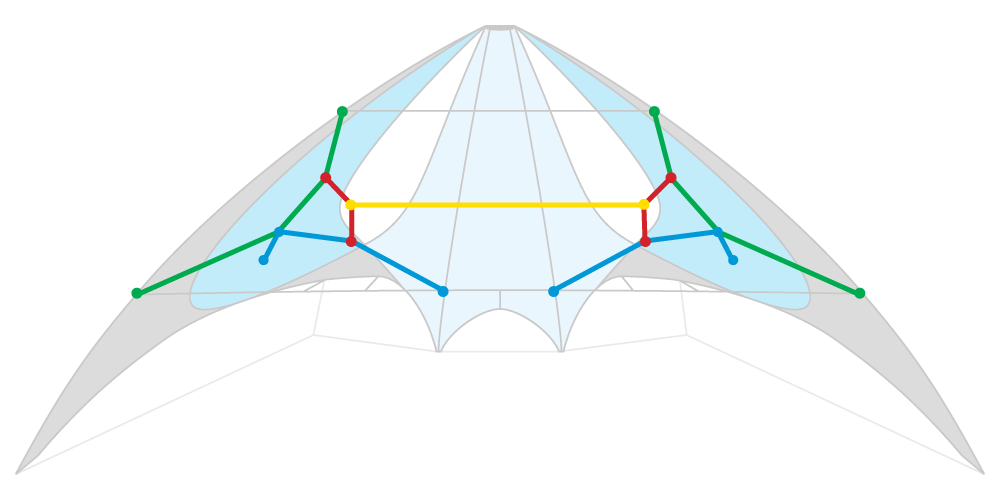
Diagram 1 shows an overview of the the Cross-Active Bridle on a Gemini.
|
|
Diagram 1 Gemini Cross-Active Bridle |
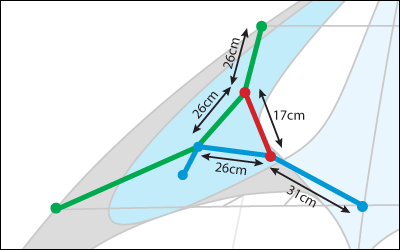
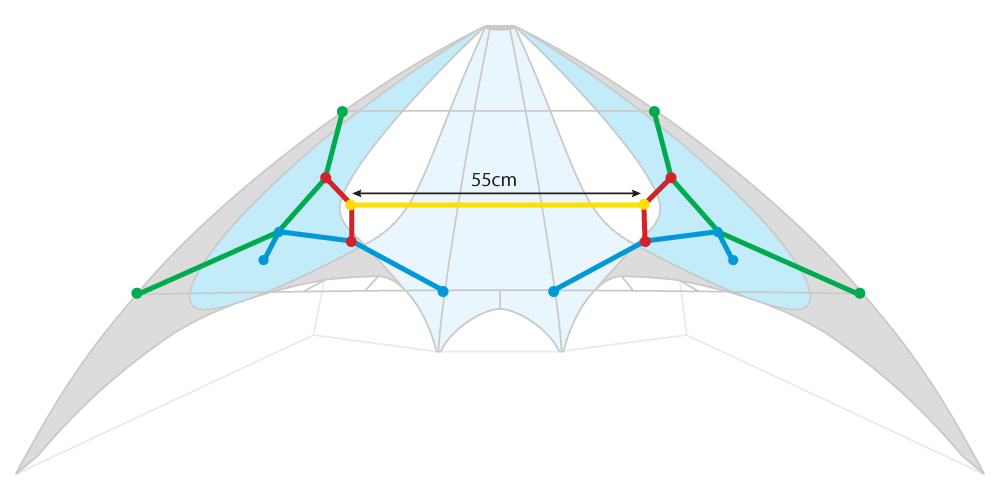
The green (outer) and blue (inner) lines indicate the three legs of the basic static bridle. In this case, the twin spines of the Gemini mean that the inner legs don't meet in the middle as they would at the T-Piece on a single spine kite, but the principle is the same for both single and twin spine kites.
The red lines show the two activator legs that are then added to connect the upper and inner legs of the bridle on each side of the kite. These provide the pitch control which allows the angle of attack of the kite to change in response to wind conditions, kite orientation, flier input and so on.
The yellow line shows the cross-activator line which connects together the activators on each side of the kite. This pulls the tow points inwards when the kite is flying in a straight line and pressure on the flying lines is more or less equal. This has the effect of improving precision and straight line tracking at speed. However, the tow point is free to move further outboards when there is more pressure on one line than the other. This makes for smoother turning, tighter spins, better side slides, easier backspins, backflips, and other rotating tricks.
The Cross-Active Bridle is now standard on the Ultralight Gemini, and soon will be on the standard Gemini. If you've got a Gemini with the original bridle (with the inner legs that are crossed over) then you might like to replace it with the new version.
Here are the measurements for the lengths of line required, measured from end to end. The two activators should be cut from unsheathed Spectra/Dyneema or a similar high quality line with minimal stretch. All other lines should be cut from regular sheathed bridle line with a Spectra/Dacron core. The ends of all lines should be sealed and flanged with a hot knife or cigarette lighter.
Gemini Cross-Active BridleBridle line lengths (cm)
|
|
|---|---|
| Outer Leg (x2) | 125 |
| Inner Leg (x2) | 64 |
| Activator (x2) | 20 |
| X-Activator (x1) | 58 |
It is worth noting that these measurements may be slightly different to what you get coming out of Tim's workshop, but only by a centimetre or so. This makes no noticeable difference to the performance of the kite at all. It's just an artifact of the different way that I measure, cut and tie a bridle one at a time compared to how Tim does it en-masse for dozens of kites at a time. But it really doesn't matter - this bridle is particularly tolerant to change and you don't need to worry too much about getting everything millimetre perfect.
On the Gemini, and in fact all Benson kites, the outer legs of the bridle are made from a single piece of bridle line which attaches to the frame at the upper and lower leading edge connectors using a running knot. If you're upgrading an old Gemini bridle then the good news is that you don't need to replace the outer legs because they are more or less the same length for both bridles (125cm).
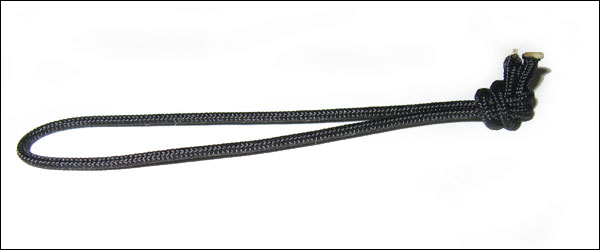
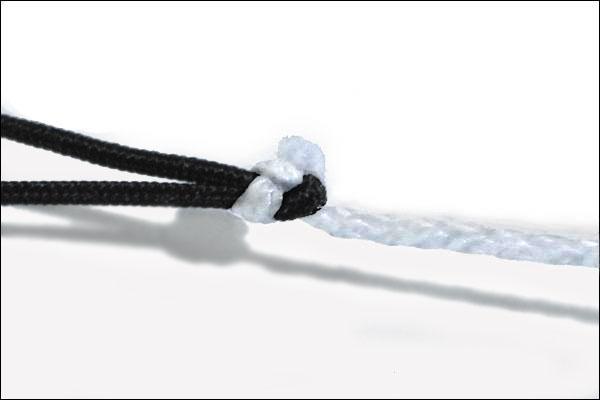
Untie and remove the old inner legs attached to the spines and replace them with the new inner legs, each 64cm long. These are attached to the spine using a running knot, and to a loop of line known as a "tracer" at the other end which forms the tow point. Diagram 2 show the tracer comprising of a length of line looped over and knotted with an overhand knot. Diagrams 3 and 4 show the inner leg being attached to the tracer using an overhand knot, and then pulled tight.
|
|
|


The outer legs are connected to the inner leg using a larks head knot looped over the tracer and then pulled tight. This is shown in diagrams 5 and 6.
|
|
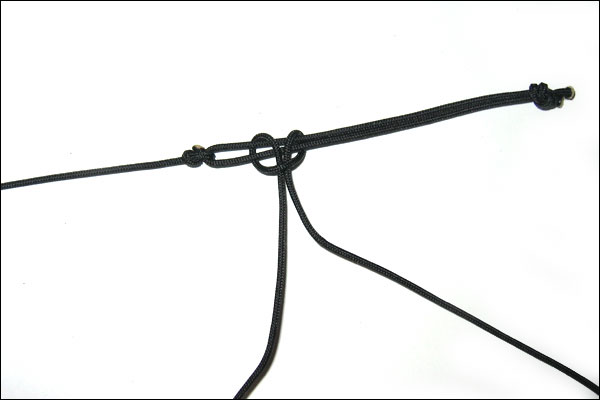

Diagram 7 shows a graphic representation of the outer legs being attached to the tracer on the inner leg. Diagram 8 shows the approximate measurements of the lines measured on the kite. These are the "minimal" measurements which do not include the allowances for knots.
|
|

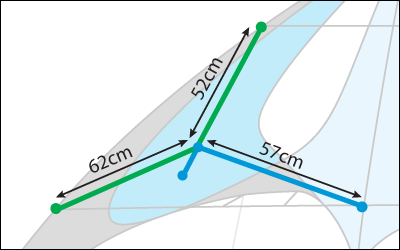
The activator should first be attached to the midpoint of the upper leg. The other end is then attached to the inner leg at the same distance away from the tow point as on the upper leg. So if the upper leg is 52cm, then the activator should be connected 26cm away from the tow point on both upper and inner legs. This is shown in diagram 9 where the activator leg is marked in red.
|
|
Diagram 9 Adding activators |
The length of the activator should be chosen to be a little shorter than the distance between these two points, so that it pulls the upper and inner legs in slightly. Shortening this line pulls the legs in further and increases the effect, allowing the kite to rock forwards and back to a greater extent. See the Dihedral Active Bridle page for further information on the effects of activator length and positioning.
The activators are attached to the upper and inner legs with a sheet bend, as shown in diagrams 10 and 11. Fold the main bridle leg in half to create a loop and then pass the free end of the activator up, around, tuck under, and pull tight.
|
|

The final step is to use another sheet bend to attach the ends of the cross-activator line to the midpoints of the activators. The cross-activator is shown in yellow in diagram 12. It should be short enough to pull the activators slightly inwards. As a rough guide, when both side of the bridle are pulled tight, the lower half of the activators on each side should be pointing directly upwards (i.e. in the direction of the nose of the kite) and forming a right angle (90°) with the cross-activator.
|
|
Diagram 12 Cross-Activator |
The cross-activator pulls the tow points inward when the kite is flying in a straight line and pressure is roughly equal on both lines. In doing so, it tends to improve the tracking of the kite and keep it flying in a straight line. As you increase the relative pressure on one line to make a turn, the tow point shifts outwards to improve the turning characteristics of the kite. The shorter the cross-activator (within reason), the greater this effect will be.
In terms of performance, one of the main benefits of this bridle is that it allows you to set the tow points a little further outward than would normally be sensible for good tracking. This tends to improve turning (up to a point, of course), and can make certain tricks like fades and backspins easier, or even possible, depending on your kite. The cross-activator will help to pull the tow points back inboard when the kite is flying in a straight line and hence provide more stable tracking and precise control.
The cross-activator also helps to distribute line tension evenly across the whole of the bridle, and ultimately, the kite. You tend to get a smoother transition into and out of turns, and a wide range of control through different turning radii, from big carving turns to fast wingtip spins. It also gives you a nice "locking-in" feeling when flying the kite in a straight line so that you're not compromising control for the sake of trickability.
And in enhancing the freestyle capabilities of a kite, this bridle really shines. It gives you a solid but smooth transition into axels, flat spins, backspins, lazy susans, etc., and works extremely well when coercing the kite into multiple and continuous axel sequences.
In addition to the performance aspects of the bridle, the fact that it is simple to adapt to any kite, easy to construct and adjust, make it highly recommended for any kite. If you don't like it, simply remove the extra legs you've added, reset your inner leg if you changed it, and you've got your old bridle back again.
One final benefit is that the cross-activator, if the length is chosen appropriately, can prevent the inner leg from becoming tangled around the tail of the spine by effectively holding it back so that it can no longer reach the tail to get tangled around.